Lately, at work, I’ve been helping to lead an implementation of an Azure Files share for a client. This is the second client we’ve set up with one, and it’s a pretty elegant solution that mitigates the need for an on-prem file server. It’s also available everywhere and doesn’t require being connected to a VPN, just to name a couple more benefits. In order to provision access, we usually setup end users with either a mapped drive or, more recently, with Azure Storage Explorer. There are numerous advantages to using Storage Explorer, in my opinion, but that’s not really the scope of this post. However, the ability to use an SAS (Shared Access Signature) URI is one that is relevant.
There are numerous ways to secure access to an Azure Files share. You can provision an Azure AD account and use traditional RBAC roles at the storage account level. That way when a user logs in from Storage Explorer, the portal, or the portal app, the user gets the desired access. If you’re using a Classic storage account, this might result in granting too much access to an end user, though. You’re reduced to using roles such as “Contributor” and at the entire storage account level. If your storage account is of the Resource Manager variety you can use new RBAC roles to get more fine-grained control. If configuring a mapped drive, you can use one of the two storage account keys to setup access. It’s a bit nuclear because it’s really intended to be used as administrative access, but the only way to map a drive is to use a storage account key per this article, in fact. You can’t use an SAS URI as you can with Storage Explorer. As I eluded to earlier, this is just one of the big feathers in the cap for using Storage Explorer over mapped drives. You can also create an account SAS (because it’s defined at the storage account level), or a Service SAS (defined at the Blob, File, Table, or Queue level) as mentioned in this SAS overview. Whew…I’m already going cross-eyed ![]() . But what happens if you have a requirement for controlling access for a contractor or a temporary employee? What’s the best way to handle that? And what if your share resides in a Classic deployment model and you can’t take advantage of the more fine-grained RBAC roles? We’re going to talk about a bit of a hybrid approach using the aforementioned Service SAS.
. But what happens if you have a requirement for controlling access for a contractor or a temporary employee? What’s the best way to handle that? And what if your share resides in a Classic deployment model and you can’t take advantage of the more fine-grained RBAC roles? We’re going to talk about a bit of a hybrid approach using the aforementioned Service SAS.
A plain ol’ SAS without any sort of policy is known as an ad-hoc SAS, as defined in this article. It’s dubbed “ad-hoc” because all of the attributes that define the SAS are stored right in the URI. During my research on the best way to balance access to the share with proper security, I found that the ad-hoc Service SAS (Service because I only wanted to provision access to the Files service) is a decent solution. It’s great for quick hits and temporary access where the access will expire quickly. When using these, the rule of thumb is to not set the expiration date for too long into the future. If a user’s contract isn’t renewed for example, you want the SAS to expire pretty quickly so the risk of unauthorized access is at a minimum. That’s great, but what if you don’t know when a user’s contract will be up, or how many times they’ll be renewed, etc. Also, maybe you don’t want to have to deal with constantly renewing their access every renewal period. Maybe still you’d rather be able to revoke a user’s access on-demand rather than wait for a SAS to expire, leaving the share exposed in the meantime. In the ad-hoc SAS scenario and even the mapped drive scenario, a storage account key is used to sign an SAS or setup administrative access with a mapped drive. This is a problem because if we ever need to expire access or the SAS or storage account key get compromised in any way, you have to regenerate or rotate the storage account keys. This could have major implications on business contnuity. Applications relying on those keys would have to get updated, users using SAS URIs or mapped drives signed with that key would have to be configured with new ones and all of it would have to be remedied basically at the same time. So we need some kind of choke point that decouples us from direct access to the storage account keys. Enter the Stored Access Policy.
In my research, I came across Hussein Salman’s excellent blog post series on SAS and specifically on using them in conjunction with stored access policies. It really helped me weed thru the confusing landscape of secure, temporary access as I eluded to earlier. Hussein’s post on policies showed how to configure such a policy for Blob containers via the Azure portal. Yet, to my surprise when I went to the Azure Files section of the portal, there was no such UI for configuring a policy. So, I endeavored to find out how to do it. I eventually figured out how to do it using the Azure CLI and from Storage Explorer as well. The latter I didn’t even realize until I was writing this blog post. It only takes a few commands or steps and at the end you’ll have an Azure Files Service URI based on a stored access policy which you can hand your end user that’s as locked down as you like. You’ll also be able to revoke that URI at any time, like when your client informs you they haven’t renewed the end user’s contract. And perhaps best of all, you’ll insulate yourself from having to regenerate storage account keys in an unplanned fashion. Let’s look at the CLI approach first:
Azure CLI
These commands can be found in the Azure CLI documentation and basically follow the CRUD commands you’d expect. Of course, you need to use az login and login with an account that has sufficient permissions to run these commands. The first command we want to run creates the Shared Access Policy:
az storage share policy create --name OneDayAccessFileShare --share-name <some share name> --expiry 2020-05-10T18:08:01Z --permissions rwdl --account-name <some storage account name>
We’re creating a Stored Access Policy that’s scoped to a file share. We give it a good, descriptive name: OneDayAccessFileShare which implies this will be just for a day as we’re testing. We then specify the share name which has to match the actual share name of course. The expiration value, which for our testing purposes is about a day in the future. This can be set to any point in the future, such as some number of months or years down the road. As mentioned already, you want to try and keep these durations as short as possible, but we will see how to revoke these should we need to expire them manually. We then specify the permissions needed. In our test case here we’re granting all of them: read, write, delete, list. Finally, we specify the storage account name.
az storage share policy list --account-name <some storage account name> --share-name <some share name>
As you can probably guess, this command just lists out the policy to ensure it took, and you get something that looks like this:
"OneDayAccessFileShare": {
    "expiry": "2020-05-10T18:08:01+00:00",
    "permission": "rwdl",
    "start": null
  },
Now that we’ve got our policy created, we can generate an SAS:
az storage share generate-sas --name <some share name> --policy-name OneDayAccessFileShare --account-name <some storage account name>
This generates output that looks something like this:
sv=2018-11-09&si=OneDayAccessFileShare&sr=s&sig=Lpj%2Bqz50nM8J7z4AgMXWzHOe6tzDELjg1sIO5q3/fj0%3D
This is basically a query string that we can append to our file share URL. If you don’t know your file share URL, the easiest way to find it, in my opinion, is to look at the properties for the file share in the portal. Notice the reference to the policy we created assigned to the si variable.
You would now take the full URI and send it to the end user for access in Storage Explorer. You definitely want to take care in doing this, because anyone with this SAS URI will be granted access.
But what about revoking the signature as we mentioned earlier? There’s one more command we need to use in order to revoke the SAS if we need to expire it on-demand for any reason:
az storage share policy update --name OneDayAccessFileShare --share-name <some share name --expiry 2020-05-08T18:08:01Z --permissions rwdl --account-name <some share name>
To expire the SAS we update the policy to use an expiration date in the past. This automatically revokes the SAS by way of the policy. Because the SAS gets sent with each request to the share, this will pretty much immediately revoke access to anyone using this SAS URI. You can also just delete the policy, but the good thing about just updating the expiration date is that updating it back to a future date enables the SAS again. So now you have full control over a user’s access with just one line in the Azure CLI!
Azure Storage Explorer
As I mentioned, while I was writing this post I was pleasantly surprised to find that the UI I had been looking for in the portal is actually baked into Storage Explorer. That’s ok, it made me get familiar with the relevant Azure CLI commands and it’s nice to know more than one way to skin a cat. Basically, we’re going to do the same thing we did with the commands above, just in Storage Explorer. And lest I not mention it, kudos to Microsoft for making Storage Explorer, and the CLI for that matter, cross-platform! This is yet another benefit of Storage Explorer in that it’s the same access, interface and functionality on any OS. I’m doing all of this on my MacBook Pro and it’s the same experience as on Windows. And for those of us supporting different end user preferences and environments, consistency is a great thing. ![]()
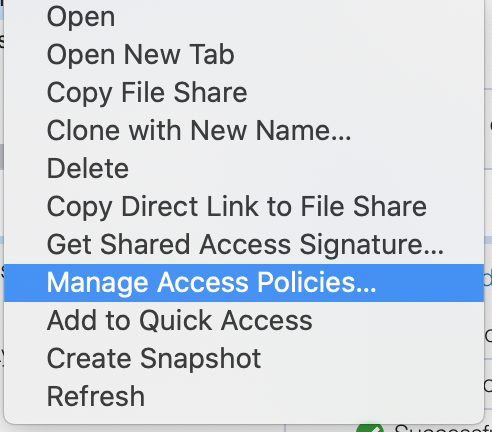
Just as with the CLI, you need to be logged in to Storage Explorer with an account that has the appopriate privileges to perform these operations. Let’s start with creating the policy. Right-click on your file share and you’ll see options similar to these:

Choose Manage Access Policies and you’ll see a screen similar to this:

If you’ve already perfomed the CLI steps above, you’ll see one or more policies listed. You’ll notice you basically have the same options available to you as with the CLI steps. One notable exception is the presence of a Create permission. Per the CLI documentation for az storage share policy create the only permissions you can specify via the CLI are rwdl. There is no c or mention of a create permission. Yet, in the portal when creating an ad-hoc Files Service SAS you can specify one and in Storage Explorer you can as well. I don’t see any difference in behavior in Storage Explorer using either method however, as you can still upload files to the share, create folders and manipulate them as you would like. It is curious to me that there’s a discrepancy, but I honestly don’t know why this is. If you know, please comment and share your wisdom!
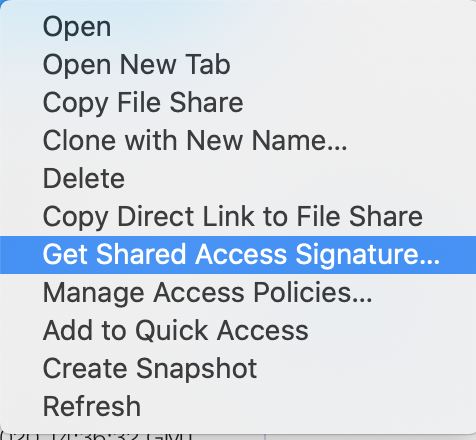
Once the policy is created, you can right-click again on the share and choose Get Shared Access Signature:

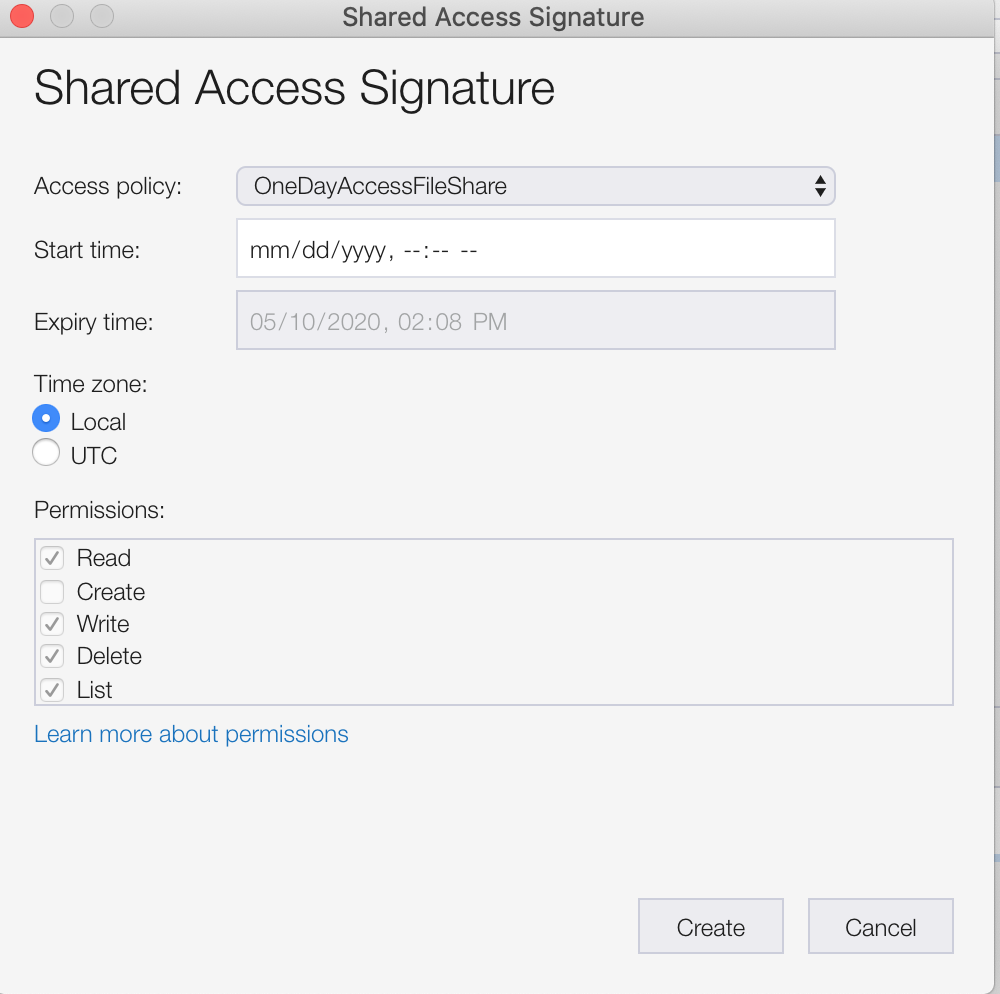
You’ll see a screen like this:

At the very top, you can specify the policy you just created and the relevant values will populate based on how you set your policy, other than the Start time: field. It will basically be null. Clicking create will create a URI that you can share with your end user. You don’t even have to append the SAS with the endpoint! Although, it gives you a query string representation as well ![]() .
.
Summary
Using Stored Access Policies to control access to resources like Azure Files shares has three distinct advantages:
- We create a choke-point where you can control access, particularly to users outside of an organization.
- We eliminate the need to rotate/regenerate storage account keys which could impact availability should you need to revoke access.
- We allow for fine-grained control of permissions to Azure Files shares no matter which deployment model we’re using.
I’d love to hear how you’re securing your Azure Files shares or any constructive feedback you might have. Hopefully this post will help a little the next time you or I are weeding through all the possible options Azure has to offer.
